

Leaflets are a suitable tool if you want to draw attention to yourself in everyday life, in your surroundings (not virtually, but the electronic version of the leaflets can also be used for online sharing and distribution), e.g. in shops, schools, public places, at various events and events. You can distribute them either in person or leave them on places for disassembly for those interested.
The leaflet should contain simple text clearly expressing what interesting you are offering, links to you (phone, website, social networks, or address), to be attractive to look at. There are a number of free tools where flyers can be created (e.g. Canva) on your own.
Leaflets are no longer a key tool in today’s, but they can serve well as a support tool, for example, in the presentation or sale of your production (markets).
The leaflet will also hit a group of people who cannot be reached digitally
Not very used tool
Less intervention
It is necessary to invent engaging content and visuals
You do not need to send out flyers in printed format, it always costs a lot more money than to distribute it via e-mail attachments, in social networks or WhatsApp etc.
Campaigns (like for Christmas, Easter etc.)
Open-door-days
For display in different institutions etc.
Discount campaigns
Invitations for Markets/Events
Vouchers

Templates free of charge, photos, graphics, etc.
Source: stockata.de
Store opening or notifications for events:
Display flyers etc. in supermarkets (high frequented location!)
Display flyers etc. in different stores: like cafés, regional farm shops, museums, hair stylist etc.
Cooperation with other stores: like glass manufacturers, stoneware production, etc.
Pay-per-click (PPC) is an internet advertising model used to drive traffic to websites, in which an advertiser pays a publisher (typically a search engine, website owner, or a network of websites) when the ad is clicked.
It conveys information about how effective the advertising was
Clicks are a way to measure attention and interest
Other benefits include ad delivery speed, precise targeting, regionalization, measurability, controllable budget, and flexibility of adjust
The complexity of setting up and tracking campaigns – how and where to set up your ad to track which data
Technical problems in display on various devices
A higher PPC does not guarantee a higher position
The costs depends on the number of clicks and the cost per click
The online advertising service, which allows advertisers to reach potential customers on the Google Network with advertising, works on a cost-per-click basis, but also offers other payment methods, such as cost-per-impression or cost-per-view. Google Ads appear above, below, or in the right-hand column alongside Google search results. It is a frequently used tool that is effective if set up and optimized. Works with keywords that customers enter into search engines / browsers, in this case Google.
Highly targeted ad paid for clicks (clicks on a link, not paid for a given ad impression to a potential customer) based on the set budget
It can be targeted by basic geographical (country, region, city), demographic (age, gender), technological (type equ
Relatively high time required to prepare the ad
Often the need to have the ad set up by an expert (to make it really functional and bring results)
The need for constant optimization.
Middle
Websites are usually the business card of their owner. It should give visitors a comprehensive view of activities, products or services and arouse their interest in the next event (purchase, more information, contacting, participation in the event, etc.). Their work will take a lot of time, but it is worth it. There is no need to create large pages with professional elements. There are several free online tools to help anyone create a website. Of course, it is possible to order the company that creates the site for both visual and content pages. However, it is important to choose quality content (text and images / videos) that captures, explains everything important and is regularly updated.
An overview of information in one place
The existence of free online web design tools
Constant updating is necessary to ensure the credibility of the site
High costs of creating a professional website in the case of an external company
Low – Medium – High
How to set up a Personal Webpage by myself?
Free Website Builders
Website builders have become powerful tools. They mainly focus on standard websites, both with or without a blog or other functions. Most of them also let you create an online-shop in an intuitive and visual way. One of the advantages is the one-stop-shop concept – hosting, domain, and website editor all from the same provider. They are also easy-to-use tools. You do not need to install any software on your computer!
Creating a website with a website builder usually entails the following steps:
Sign up for either a free or a trial account (however this should not be the permanent solution, the most provider’s costs between 15-40 Euros per month)
Choose a design you like
Customize the content on your website
Choose your hosting provider: there are a few providers on the market, just search via a search engine machine and get started. Each provider has its own advantages and disadvantages. Simply, hosting is where your websites lives. Most web hosting companies will help you pick a hosting plan and walk you through the entire set-up. One thing to note is that when you buy your domain name, the same companies usually offer web hosting services as well. So, if you prefer convenience, it is easier to use the same provider for both.
Choose a domain name: e.g. www.pretty-ceramics.eu or ceramics-max-mustermann.com. You can buy your domain at a few different domain registrars. Most should cost between 15–30 EUR per year. Try using .com or .eu extension if possible. The extension .com or .eu are good to use, if you want to sell your products in the whole EU. If you just want to sell your products in your local environment, you can use the company shortcut like .de for Germany.
You are creating a website for a reason. Before you start building, think about your goals: who is the target audience, what do they need etc. (set up a Marketing plan, see other section).
You want to:
Attracting new customers?
Offering an online-shop? That means sell products online?
Answering questions to your products?
Writing a blog about your work?
Give information about your business or local shop?
Show and promote your work?
Organize your website structure: Everything about your website, including how the pages are organized, the design and copy, should all work to achieve your goals, see questions above. Start by figuring out all the pages that you will need and then deciding which pages will go on your main navigation and which can live one level below. The more pages you have, the more complicated your site will be! For the start, limit the number of pages and focus on the ‘must-have pages’ first. The most relevant and most visited pages that every website should have is a homepage, products you offer (if you have a wide range of products, limit it on your website!), about page, which markets you visit, contact page, which other services you offer. See below, this is just an example. Please note: just set-up the pages which are relevant for your business!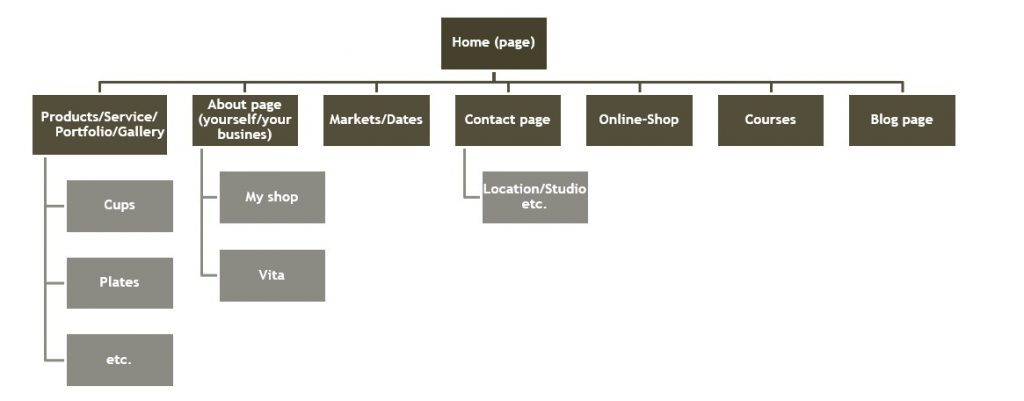 But depending on what your website needs, you can always expand afterwards. Once you have your pages, develop a structure that makes the most sense to help people find what they are looking for. Tip: Get inspired by other websites! Look on websites you also like to visit. Also get inspired by other creatives and ceramists, but be careful, copy is not the way to behave!
Design your website: A lot of the website builders have predesigned layouts and design tools you can choose from. Some of them use drag and drop building options, for others you will need some more knowledge on how to design a webpage. Most of them have forums or you can call a telephone support, where you will find a lot of answers. Think about how you want your brand/products/business to be perceived by the public. Use consistent colours and imagery throughout the site. If you do not have your own images to use, you can find professional-looking photos from various free and paid websites, go to a search engine machine and search for photos, which suit to your website and business. However, in the near future you should fill your website with your own photos of your studio, your products etc.
Social Network with an own profile
How to create a Social Network with an own Business profile/Brand Page?
Such Pages help companies, brands, organizations and public figures share their news and connect with people. As with profiles, Pages can be customized with news, events and more. People who like or follow a Page can receive updates in the news section.
To create a Page:
Sign up to a new account:
Go to the social network platform provider. Select the type of page you want to create: business/brand or community/public figure (differs of each platform provider). Click the Get Started button for your option. Enter your business information, like page name. Here you can use your commonly used business name, people are likely to search for when trying to find your business.
Choose your category type:
Type a word or two that describes your business and the platform will suggest some options. Choose the one your customers are most likely to think of when they think about your business. Once you choose your category, the box will expand to ask for a few further details, like your address and phone number. You can choose whether to make this information public, or to show only your city and state. Note that doing so indicates your acceptance of the social network platform, groups and events policies, so you might want to check those out before you proceed.
Add Pictures
Upload profile and cover images for your social network platform page. It is important to create a good visual first impression, so choose wisely here.
Profile image – this image accompanies your business name in search results and when you interact with users. It also appears on the top left of your social network platform page. Your social network platform profile picture displays at around 170 x 170 pixels on desktop and around 128 x 128 pixels on mobile. It will be cropped to a circle, so do not put any critical details in the corners. Once you have chosen a great photo, click Upload Profile Picture.
Cover image – the most prominent image on your platform business page. This image should capture the essence of your brand and convey your brand personality. It will display at around 820 x 312 pixels on desktop or around 640 x 360 pixels on mobile. The image must be at least 400 pixels wide and 150 pixels tall, but the recommended size to upload is around 720 x 315 pixels. Once you have selected an appropriate image, click Upload a Cover Photo.
Here is a pro tip: You can even upload a cover video or feature a slideshow of images! For more information and fun ideas.
Create your username
Your username should be your company name. You want it to be easy to type and easy to remember. Click Create Page @Username in the left menu to set up your vanity URL.
Click Create Username when you are done. A box will pop up showing you the links people can use to connect with your business on the social network platform.
Add your business details
Fill out all of the fields in your Social Network Page’s About section at the beginning. As the social networks are often the very first place a (potential) customer goes to get information about you, having it all there is important. To start filling out your business details, click Edit Page Info. From this screen, you can share all the important information about your business.
Description
This short description appears in search results. It should be just a couple of sentences, so there is no need to get too elaborate here. Just describe which kind of products/service you offer.
Categories
Here you will see the category you entered in Step 1. If you like, you can add additional categories here to make sure the social network platform shows your page to all the right people.
Contact
Add all the contact details you want to make public, including your phone number, website, email, online-shop etc.
Location
If you have a physical shop, check to make sure that your location is marked correctly on the map.
Hours
If your business is open to the public during specific hours, enter those here. This information appears in search results and is very useful for (potential) customers.
Extra options
If relevant, enter your imprint (legal notice), price range, and privacy policy link. An imprint is a legal statement of ownership, and it is generally only required in some European countries, but please be aware every country has its own policies on it. Get familiar with it!
Click Save Changes under each section to implement your changes.
Tell your story
There is a section of your social network platform for business page where you can add a longer description of your business. To access it, click See more in the left menu, then click About, and then click Our Story on the right-hand side.
In this section, you can add a detailed description of what your business offers customers and why they should Like or Follow your Page. This is a great place to set expectations. Enter a headline and text for your story, and then upload a relevant photo. When you are finished, click Publish.
Create your first post
Before you start inviting people to like your social network page for your business, you should post some valuable content. You can create some of your own posts. For sure, you have photos/videos of your work for sharing!
You could also create a specific type of post like an event (open door day in your pottery) or product offer—just click one of the options in the Create box at the top of your page.
Publish your page and invite an audience
Your social network business page now represents a robust online presence that will make potential customers, fans and followers feel comfortable interacting with you. Go to Publish Page button in the left-hand menu.
Start by inviting your existing social network friends to like your page. Also ask established customers to like your page and follow you. Use your other channels, like your website, to promote it. Add “follow us” logos on your promotional materials and email signature.
Social Network specialised on pictures and videos
How to create a Social Network Platform specialised on pictures and videos with a Business Profile?
People come to such a platform to be inspired and discover things they care about, and that includes content from brands and businesses:
Around 60% of people say they discover new products on such platforms
Around 200 Million+ followers visit at least one Business Profile daily
Around 80% Increase in time spent watching video on such platforms
Around 1/3 of the most viewed stories are from businesses
Download the application and create an account
Download the social network platform specialised on picture and video application. It is better to download this application on your mobile phone, as it is easier to use. Once the application is installed on your mobile phone, tap to open it. Tap Sign Up, then enter your email address and tap next, or tap log in to your social network platform to sign up with your account (if you have an existing social media account on another platform). Choose a username that clearly represents your business, like your business’ name. Add a profile photo (photo of your work or your logo would be suitable), a biography (small sentences about your business: like handmade ceramics, offers courses, online-shop etc.) and a link to your website.
Set up a free business profile
Within the app, find Settings, and then scroll down to switch to Business Account (a business account has more features for business use). Once you have a business account, you can add in pertinent business information like store hours, business address or a phone number (you are not forced to add it). Create a Business Profile. Note: Your business must have a another social network account to switch to a business profile.
Post and #hashtags
The best practice case is to have a photo or two posted to your account before you start following people. There is not much incentive for people to follow an account with no content. Find a couple of photos of your products you think would be shareworthy.
Keep your caption brief and use appropriate hashtags. Hashtags help to find millions of photos, and in turn, your content can be easier found. Also, keep the hashtags to a reasonable number, around 20 not more! Followers do not want to be spammed with dozens of hashtags per post.
Example: The unique tactility of ceramic material and the many steps involved in the process make it easy to show with vivid clarity how beautiful many moments are in making anything out of clay. As a way to promote ceramics and pots on this platform, try and pay particular attention to parts of the process that will never be seen in the final piece. The corkscrew of trimmed clay, the viscous splash of slip, the gear-like shadow of a scalloped plate edge as it rotates on the wheel.
Follow people and get social!
By this point you have a complete profile, a couple of posts shared, and now it is time to start following people so they start following you. From your profile page, go to the options page (gear in the upper right corner) and choose Discover People.
You can connect different social networks with each other and your address book. If you have got past clients and connections stored on your phone, you will be able to see their accounts. Spread the worth to your customers, that you have a social media account.
As you post more to the platform and follow more people, you can check your notifications page (heart icon) to see who has liked your photos, started following you, left a comment, or mentioned you in a post.
Social Network specialised on pictures and videos – Sales Tool
Via “Promote” post and add “Shop Now” button.
Precise targeting
Interactive and fast creation
Only for people on this platform
For free (Low)
Creating an account and creating an post is “For free”, but its promotion is “Low”
On this platforms user get inspiration for their daily life, in different fields. Users where shown interesting daily goods, so that mean if a post is impactful formatted, the user is rather more welcome to buy products. You can upload photos and videos to such platforms.
Get started with your online pin-poard:
Start a new account: Enter your data and click on account
Following the further instructions: upload a profile picute, enter the name of your business or person, link your website, links other external online-shops. Set you region and language.
Go further and following the instructions regarding the options of the focus on your business/profiles
Choose the kind of your business
Upload your first photo/video
Tip: It is essential to post something on a regualr basis. The followers expect input from your side. So be sure, that you set a post (photo/video) three to four times a week.
Websites are usually the business card of their owner. It should give visitors a comprehensive view of activities, products or services and arouse their interest in the next event (purchase, more information, contacting, participation in the event, etc.). Their work will take a lot of time, but it is worth it. There is no need to create large pages with professional elements. There are several free online tools to help anyone create a website. Of course, it is possible to order the company that creates the site for both visual and content pages. However, it is important to choose quality content (text and images / videos) that captures, explains everything important and is regularly updated.
An overview of information in one place
The existence of free online web design tools
Constant updating is necessary to ensure the credibility of the site
High costs of creating a professional website in the case of an external company
Low – Medium – High
How to set up a Personal Webpage by myself?
Free Website Builders
Website builders have become powerful tools. They mainly focus on standard websites, both with or without a blog or other functions. Most of them also let you create an online-shop in an intuitive and visual way. One of the advantages is the one-stop-shop concept – hosting, domain, and website editor all from the same provider. They are also easy-to-use tools. You do not need to install any software on your computer!
Creating a website with a website builder usually entails the following steps:
Sign up for either a free or a trial account (however this should not be the permanent solution, the most provider’s costs between 15-40 Euros per month)
Choose a design you like
Customize the content on your website
Choose your hosting provider: there are a few providers on the market, just search via a search engine machine and get started. Each provider has its own advantages and disadvantages. Simply, hosting is where your websites lives. Most web hosting companies will help you pick a hosting plan and walk you through the entire set-up. One thing to note is that when you buy your domain name, the same companies usually offer web hosting services as well. So, if you prefer convenience, it is easier to use the same provider for both.
Choose a domain name: e.g. www.pretty-ceramics.eu or ceramics-max-mustermann.com. You can buy your domain at a few different domain registrars. Most should cost between 15–30 EUR per year. Try using .com or .eu extension if possible. The extension .com or .eu are good to use, if you want to sell your products in the whole EU. If you just want to sell your products in your local environment, you can use the company shortcut like .de for Germany.
You are creating a website for a reason. Before you start building, think about your goals: who is the target audience, what do they need etc. (set up a Marketing plan, see other section).
You want to:
Attracting new customers?
Offering an online-shop? That means sell products online?
Answering questions to your products?
Writing a blog about your work?
Give information about your business or local shop?
Show and promote your work?
Organize your website structure: Everything about your website, including how the pages are organized, the design and copy, should all work to achieve your goals, see questions above. Start by figuring out all the pages that you will need and then deciding which pages will go on your main navigation and which can live one level below. The more pages you have, the more complicated your site will be! For the start, limit the number of pages and focus on the ‘must-have pages’ first. The most relevant and most visited pages that every website should have is a homepage, products you offer (if you have a wide range of products, limit it on your website!), about page, which markets you visit, contact page, which other services you offer. See below, this is just an example. Please note: just set-up the pages which are relevant for your business! But depending on what your website needs, you can always expand afterwards. Once you have your pages, develop a structure that makes the most sense to help people find what they are looking for. Tip: Get inspired by other websites! Look on websites you also like to visit. Also get inspired by other creatives and ceramists, but be careful, copy is not the way to behave!
Design your website: A lot of the website builders have predesigned layouts and design tools you can choose from. Some of them use drag and drop building options, for others you will need some more knowledge on how to design a webpage. Most of them have forums or you can call a telephone support, where you will find a lot of answers. Think about how you want your brand/products/business to be perceived by the public. Use consistent colours and imagery throughout the site. If you do not have your own images to use, you can find professional-looking photos from various free and paid websites, go to a search engine machine and search for photos, which suit to your website and business. However, in the near future you should fill your website with your own photos of your studio, your products etc.
Your own blog can be part of a website or it can be created using various online tools (often free). On the blog, you share your thoughts, experiences, observations, ideas from your field with the public, you inspire. You create a base of readers who are interested in what interests you. In the articles you can point out your products and encourage them to buy them.
A simple tool for communication with regular and potential customers
It is free
Time consuming
Regular insertion of articles
For free
The costs = your time
The need to have a writing talent
Social Network with an own profile
How to create a Social Network with an own Business profile/Brand Page?
Such Pages help companies, brands, organizations and public figures share their news and connect with people. As with profiles, Pages can be customized with news, events and more. People who like or follow a Page can receive updates in the news section.
To create a Page:
Sign up to a new account:
Go to the social network platform provider. Select the type of page you want to create: business/brand or community/public figure (differs of each platform provider). Click the Get Started button for your option. Enter your business information, like page name. Here you can use your commonly used business name, people are likely to search for when trying to find your business.
Choose your category type:
Type a word or two that describes your business and the platform will suggest some options. Choose the one your customers are most likely to think of when they think about your business. Once you choose your category, the box will expand to ask for a few further details, like your address and phone number. You can choose whether to make this information public, or to show only your city and state. Note that doing so indicates your acceptance of the social network platform, groups and events policies, so you might want to check those out before you proceed.
Add Pictures
Upload profile and cover images for your social network platform page. It is important to create a good visual first impression, so choose wisely here.
Profile image – this image accompanies your business name in search results and when you interact with users. It also appears on the top left of your social network platform page. Your social network platform profile picture displays at around 170 x 170 pixels on desktop and around 128 x 128 pixels on mobile. It will be cropped to a circle, so do not put any critical details in the corners. Once you have chosen a great photo, click Upload Profile Picture.
Cover image – the most prominent image on your platform business page. This image should capture the essence of your brand and convey your brand personality. It will display at around 820 x 312 pixels on desktop or around 640 x 360 pixels on mobile. The image must be at least 400 pixels wide and 150 pixels tall, but the recommended size to upload is around 720 x 315 pixels. Once you have selected an appropriate image, click Upload a Cover Photo.
Here is a pro tip: You can even upload a cover video or feature a slideshow of images! For more information and fun ideas.
Create your username
Your username should be your company name. You want it to be easy to type and easy to remember. Click Create Page @Username in the left menu to set up your vanity URL.
Click Create Username when you are done. A box will pop up showing you the links people can use to connect with your business on the social network platform.
Add your business details
Fill out all of the fields in your Social Network Page’s About section at the beginning. As the social networks are often the very first place a (potential) customer goes to get information about you, having it all there is important. To start filling out your business details, click Edit Page Info. From this screen, you can share all the important information about your business.
Description
This short description appears in search results. It should be just a couple of sentences, so there is no need to get too elaborate here. Just describe which kind of products/service you offer.
Categories
Here you will see the category you entered in Step 1. If you like, you can add additional categories here to make sure the social network platform shows your page to all the right people.
Contact
Add all the contact details you want to make public, including your phone number, website, email, online-shop etc.
Location
If you have a physical shop, check to make sure that your location is marked correctly on the map.
Hours
If your business is open to the public during specific hours, enter those here. This information appears in search results and is very useful for (potential) customers.
Extra options
If relevant, enter your imprint (legal notice), price range, and privacy policy link. An imprint is a legal statement of ownership, and it is generally only required in some European countries, but please be aware every country has its own policies on it. Get familiar with it!
Click Save Changes under each section to implement your changes.
Tell your story
There is a section of your social network platform for business page where you can add a longer description of your business. To access it, click See more in the left menu, then click About, and then click Our Story on the right-hand side.
In this section, you can add a detailed description of what your business offers customers and why they should Like or Follow your Page. This is a great place to set expectations. Enter a headline and text for your story, and then upload a relevant photo. When you are finished, click Publish.
Create your first post
Before you start inviting people to like your social network page for your business, you should post some valuable content. You can create some of your own posts. For sure, you have photos/videos of your work for sharing!
You could also create a specific type of post like an event (open door day in your pottery) or product offer—just click one of the options in the Create box at the top of your page.
Publish your page and invite an audience
Your social network business page now represents a robust online presence that will make potential customers, fans and followers feel comfortable interacting with you. Go to Publish Page button in the left-hand menu.
Start by inviting your existing social network friends to like your page. Also ask established customers to like your page and follow you. Use your other channels, like your website, to promote it. Add “follow us” logos on your promotional materials and email signature.
Social Network specialised on pictures and videos
How to create a Social Network Platform specialised on pictures and videos with a Business Profile?
People come to such a platform to be inspired and discover things they care about, and that includes content from brands and businesses:
Around 60% of people say they discover new products on such platforms
Around 200 Million+ followers visit at least one Business Profile daily
Around 80% Increase in time spent watching video on such platforms
Around 1/3 of the most viewed stories are from businesses
Download the application and create an account
Download the social network platform specialised on picture and video application. It is better to download this application on your mobile phone, as it is easier to use. Once the application is installed on your mobile phone, tap to open it. Tap Sign Up, then enter your email address and tap next, or tap log in to your social network platform to sign up with your account (if you have an existing social media account on another platform). Choose a username that clearly represents your business, like your business’ name. Add a profile photo (photo of your work or your logo would be suitable), a biography (small sentences about your business: like handmade ceramics, offers courses, online-shop etc.) and a link to your website.
Set up a free business profile
Within the app, find Settings, and then scroll down to switch to Business Account (a business account has more features for business use). Once you have a business account, you can add in pertinent business information like store hours, business address or a phone number (you are not forced to add it). Create a Business Profile. Note: Your business must have a another social network account to switch to a business profile.
Post and #hashtags
The best practice case is to have a photo or two posted to your account before you start following people. There is not much incentive for people to follow an account with no content. Find a couple of photos of your products you think would be shareworthy.
Keep your caption brief and use appropriate hashtags. Hashtags help to find millions of photos, and in turn, your content can be easier found. Also, keep the hashtags to a reasonable number, around 20 not more! Followers do not want to be spammed with dozens of hashtags per post.
Example: The unique tactility of ceramic material and the many steps involved in the process make it easy to show with vivid clarity how beautiful many moments are in making anything out of clay. As a way to promote ceramics and pots on this platform, try and pay particular attention to parts of the process that will never be seen in the final piece. The corkscrew of trimmed clay, the viscous splash of slip, the gear-like shadow of a scalloped plate edge as it rotates on the wheel.
Follow people and get social!
By this point you have a complete profile, a couple of posts shared, and now it is time to start following people so they start following you. From your profile page, go to the options page (gear in the upper right corner) and choose Discover People.
You can connect different social networks with each other and your address book. If you have got past clients and connections stored on your phone, you will be able to see their accounts. Spread the worth to your customers, that you have a social media account.
As you post more to the platform and follow more people, you can check your notifications page (heart icon) to see who has liked your photos, started following you, left a comment, or mentioned you in a post.
Social Network specialised on pictures and videos – Sales Tool
Via “Promote” post and add “Shop Now” button.
Precise targeting
Interactive and fast creation
Only for people on this platform
For free (Low)
Creating an account and creating an post is “For free”, but its promotion is “Low”
Video portals for sharing video files, where you can upload videos, watch them, rate, share and comment. Creating your own profile is very easy. Each platform can be used as a platform for your own videoblog and use links to share your videos on social networks or the web. Video recording is very popular nowadays and may be easier for some than writing long texts.
Free easy establishment and subsequent administration
The possibility of sharing recorded videos on other channels
An increase in the popularity of video communications compared to written text
All you need to shoot videos is a smart mobile phone
Poss
Ubiquitous advertising (there is a risk of video followers leaving earlier)
For free